
So you want to get into trad climbing? And you’ve decided to get into it far from the trad meccas of Arapiles, Indian Creek, The Gunks, or Yosemite. You’ve decided to start trad climbing here in New Zealand. Many would tell you to bring your diapers. I think you’re much better off taking out a second mortgage.
I can’t help you with either. Instead I offer you this series of gear reviews aimed at assisting you to build your first trad rack in a methodical manner that is both convenient for the Kiwi budget and rock.
Provided the experts of the New Zealand don’t lynch me for blasphemy first, I’m going to attempt to make some recommendations. If anyone thinks they have a better answer, give me the gear and I’ll consider it. I’m starting with a look at nuts (aka wires), will take a look at their big cousins the hexes later on, and then once DMM, Wild Country and Metolius have had time to send me some free samples I’ll look at the various camming devices that one might find useful in this part of the world. Then provided I haven’t been lynched, I’ll take a look at all the nifty little extra pieces that you might one day find useful including tri-cams, sliders and big bros.

Big disclaimer: This guide is only a guide. To really get an idea of what gear works for you, find yourself a mentor and get out on the rock. Abuse their rack, tell them it sucks, by your own pieces to replace their sucky pieces, realise your new pieces suck even more, sell to me, rinse and repeat a few times, and you’ll have a decent rack that works for you.
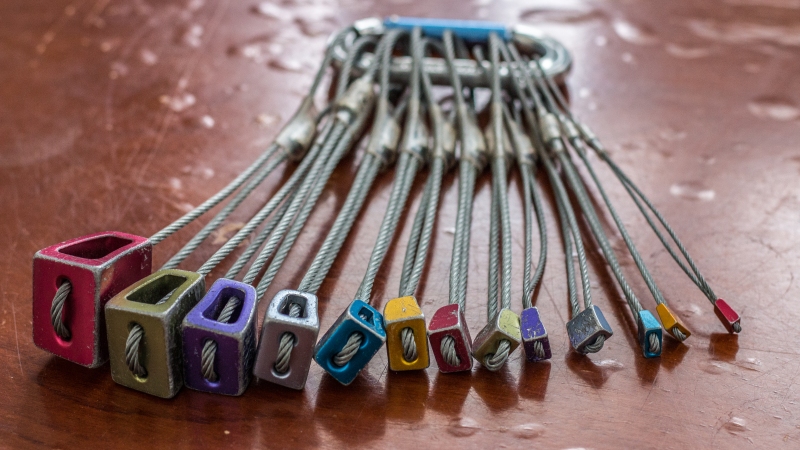
The first step in any trad rack is finding some nuts. Nuts are the foundation of all racks, both due to their low price and their near universal application. If you are climbing at Australia’s premier trad crag, Mt Arapiles, you’re going to need a wide range of nuts, including doubles of many sizes. However, if you are climbing in New Zealand, you’re going to find yourself in need of just a few nuts, probably even just one set.
The first stop for most aspiring climbers in New Zealand is Bivouac, so it’s best we start with the Black Diamond Stoppers.
The Black Diamond Stoppers generally come in two different sets, the Classic #5-#11 set and the Pro #1-#13 set. A Classic set is going to set you back $149.90NZ while a Pro set is going to cost $269.90NZ. No one ever said this trad business was cheap, get that second mortgage sorted out now.
First the classic set. Don’t kid yourself, these 7 nuts are going to be the 7 sizes you use the most. Anything smaller in your early days and you’ll be too scared, anything bigger and you’ll be plugging in those shiny new cams you put on your credit card yesterday. With a total weight of 281g, you can even stay in your lightweight sport harness without breaking your hips. Really though, they are just good beginner nuts. They have the standard weight saving hole in the middle, the cables are bomber, they are nicely coloured, and the taper is a nice simple addition to make them fit just a few more placements. But all this is standard in the market today, despite what the marketing will try tell you so don’t read too much into it.
I have a pro set, and it was even my first set of trad gear. I cheated and purchased mine in Australia so price was less of an issue, but given the extra $110 here in NZ you are much better of going with the classic set and spending the money you saved on trips to Kawakawa Bay.
You are looking at 456g with a full set, with the extra weight over the Classic set mostly in the #12 (58g) and #13 (71g). But these two are just too big and heavy to have any place on a standard rack in my opinion, only really useful as a backup to an equivalent cam. The #1 and #2 are rated for ‘direct aid’ only, meaning they aren’t designed for lead falls. Even if you have the balls to ignore the 2kn rating on the wire, you’d want to be on pretty solid granite before you even consider relying on such a small piece of alloy to hold in rock. And no rock in New Zealand is that solid; I throw the #3 in the direct aid only pile on the majority of NZ rock for this exact reason.
Which leaves the #4. I’ve hammered mine and I would recommend you grab one to add to your classic set. For the price of a few coffees, you’re going to save yourself one or two run outs that you’ll thank me for.

DMM Wallnuts
Anyone that has climbed with me knows asking me to pick between BD and DMM passive pro has one definitive answer, Wallnuts are life.
While my BD Stoppers are my oldest and have seen their share of adventures, my Wallnuts have lived their entire life on the sharp end with me. In fact, they’ve spent so much time on my rack that I think I’ve replaced all of the smaller half at least once after a few damaged wires and one or two drops (by someone else of course). I’ve never had to leave one behind though, and I’d like to thank everyone that’s helped with my replacement costs by leaving theirs as booty. The best place to find Wallnuts here in NZ is Bryces Rock Climbing Shop. You’re going to be handing over at least $270NZ for a full set so you better be sure trad is for you. Like the Stoppers they are anodised with pretty colours, everything over the #7 has a massive hole to save weight, and they are tapered to help make them fit that little bit better. What is different is the size distribution, the weight distribution, the wires and the notch on each side of the nut.

The sizes of the Wallnuts don’t line up with that of the Stoppers, there are gaps in each ones sizing that the other can fill. Working as a double set of nuts this is excellent (more on that at the end), but my findings on North Island rock is that the Wallnut sizes fit better). Weight wise, the smaller Wallnuts are heavier than the equivalent Stopper (#2 Wallnut is 26g compared to #5 Stopper at 18g, while the larger sizes are a little lighter (#8 Wallnut is 45g compared to #12 Stopper at 58g). The wires are a little stiffer on the Wallnuts as well, helping to hold the weight of the #11 (equivalent to the #13 Stopper) and the #12 when placing. But like the #12 and #13 Stopper, the #10 and #11 Wallnut are rarely going to be your first choice around here, you’ll be better off with the equivalent cams.
Which leaves the mythical notch. Whereas the Stoppers, like most other brands of nuts, have smooth sides, DMM has added a notch on each side of every size. While it probably saves a bit of weight, the benefit of this notch is much harder to analyse. I love it, there are numerous times having that notch has let my Wallnut sit flush where my equivalent Stopper wouldn’t.
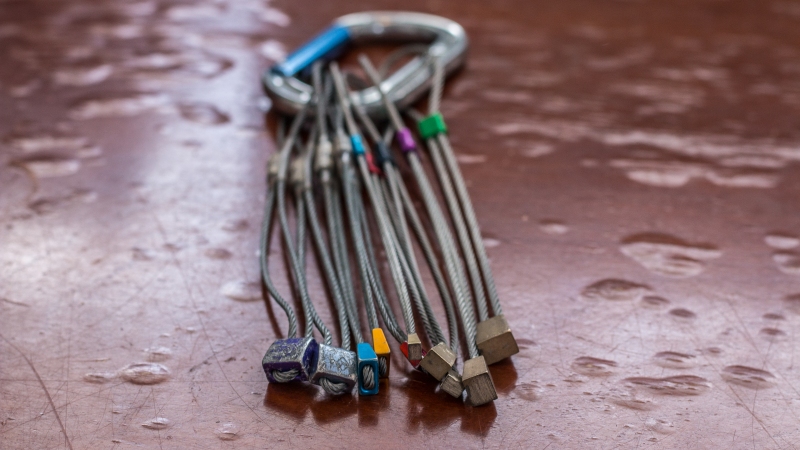
While the Stoppers and Wallnuts are traditional nuts, with numerous other alternatives I’ve ignored, DMM Offsets are a unique piece of kit that I recommend to all, regardless of your first and perhaps second set of nuts.

My offsets are relatively new; I’ve been scabbing them off others for the past few years for specific climbs thinking they were to specialized for North Island Rock. But the first day I used them I used all of them. In the first pitch. Verdict, offsets are downright revolutionary. Ok, I’m probably overstating that given most North Island trad climbers won’t ever consider even attempting that particular 21. But if you do, you’re going to want offsets (and I.M.Ps, but that’s another review).
Using the exact same wires, anodizing, and a similar notch, DMM has taken it’s wallnuts, removed the regular taper from each side and instead flared the whole nut. Making these the king of flared placements. Enough said.
Conclusion
So that’s my two cents on the two most commonly used brands of nuts in the North Island. I acknowledge there are a few out there rolling with Wild Country Rocks, but I fail to see how they are any different to Black Diamond Stoppers. And of course there are plenty of second hand nuts on the market that you can’t find brand new anymore, and some like the H.Bs I steal off Andy McLellan periodically do still have a use. But if you are getting into the sport today, your choices here in NZ are Black Diamond Stoppers or DMM Wallnuts.
My recommendation for a beginner? A Classic Set (#5-#11) of Black Diamond Stoppers and a set of DMM Alloy Offsets (#7-#11). For $300, you will have plenty of nuts for the majority of North Island routes. And when you finally visit Australia, pick up a set of DMM Wallnuts (#1-#11) and you’ll be set for life.
Racking up
But what do I actually use and how do I rack them? I always start up a trad route, anywhere in the North Island with my #1-#5 DMM Wallnuts and #7-#8 DMM Alloy Offsets and it is a rare day (but it does happen) that I don’t leave the ground with #6-#7 DMM Wallnuts and #9-#11 DMM Alloy Offsets on another biner.

Next to be racked up is my collection of ‘I’M GOING TO DIE’ nuts; my #1-#5 Black Diamond Stoppers and my #1-#5 DMM Brass I.M.Ps. These are only carried on certain routes where a bit of mental protection is required. You have to remember that most North Island rock isn’t solid enough to hold falls on such small pieces.
Then finally, if it’s going to be a long day and I’m seriously worried about running out of smaller cams I’ll take my big nuts; #8-#11 DMM Wallnuts. Then whenever I’m at Arapiles, I might add in the rest of my Black Diamond Stoppers for a total of 31 nuts weighing in at 1.1kg.
Get those weight vests on people, it’s just beginning.

Next up is Big Gear for Poor People, a look at good old hexes so the old fellas still hanging around the crag don’t have a go at me for ignoring the best musical instruments available in a climbing store. Then, having given sufficient time for everyone other than Black Diamond to send me free cams, I’ll look at how to spend that second mortgage you’ve hopefully organised.
[Cover Photo: Two full siege racks, for when you really don’t know what you are getting into – credit to Ashraf Sabbir 2015]

What was the 21? 😉
Pretty much what I would recommend, though if you want the sizes/colours to line up replace the BD stoppers with Wild Country Rocks at more expense. I agree, add the BD #4 nut, but not the #3 or below. Though the #3 will hold lead falls (gulp), the flat shape is not great in most NZ rock.
Personally I use wallnuts 1-11 and rocks 1-6.
I prefer DMM brass offsets 2+ rather than the straight-sided IMPs (or the Aussie RPs they are based on) for NZ rock, and they WILL hold lead falls in NZ rock, though perhaps not ignimbrite. The BD iron/copper mix small offsets are pretty decent cheaper alternatives, but not quite as sticky or strong.
To round it out with bigger/weirder placement options that you will grow to love, add a set of 4 DMM torque nuts, they are just ace, way better than any other hexes. And maybe a pink/red tri-cam or two, especially for Kawakawa.
LikeLike